🎮 Hardware · All Roles

V5 Controller Guide

Your controller is the only interface between your driver and the robot. Every match depends on it being charged, mapped, and in your hands — not your pocket.

// Section 01
Controller Overview
What it does, who uses it, and what every team member needs to know.
VEX V5 Controller — front and back views showing all labeled inputs: Axis1–4 joysticks, ButtonA/B/X/Y, ButtonUp/Down/Left/Right D-pad, ButtonL1/L2/R1/R2 shoulder buttons
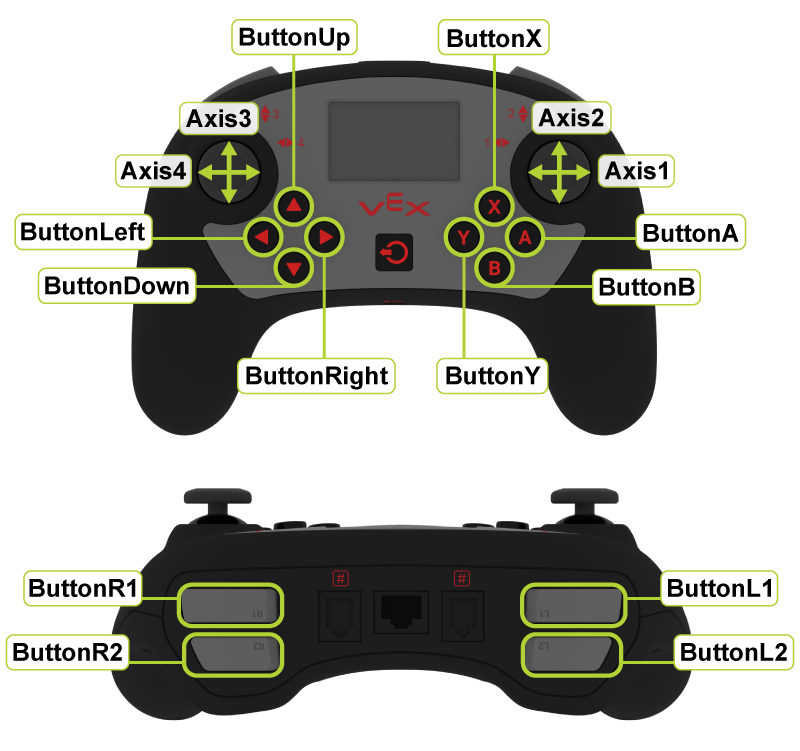
VEX V5 Controller · Front & Back · All inputs labeled
🎮
Who should read this guide: Drivers (primary), programmers (for mapping and debugging), engineers (for care and troubleshooting), and any team lead who runs pre-match checks.

What the V5 Controller Does

Wireless: The V5 Brain has a built-in radio. Power on the Brain, power on the controller — they pair automatically when set to the same robot.

Left Joystick
Drive / Strafe
Typically controls robot movement — forward, backward, and turning in tank or arcade drive.
Right Joystick
Turning / Secondary Drive
Controls turning in arcade drive, or the right drive side in tank drive. Sometimes used for mechanisms.
L1 / L2 Shoulder
Left Shoulder Buttons
Two-level buttons ideal for intake control, lift direction, or any action needing two states (up/down).
R1 / R2 Shoulder
Right Shoulder Buttons
Mirror of L1/L2. Often used for scoring mechanisms, claw control, or auton selector navigation.
A / B / X / Y
Face Buttons
Four large buttons on the right side. Used for presets, toggles, emergency stops, or auton selector confirmation.
Up / Down / Left / Right
D-Pad
Four directional buttons. Good for auton selector navigation, mechanism presets, or partner controller coordination.
LCD Screen
Controller Display
Displays battery %, connection status, and can show custom text from your program. Check it before every match.
Battery & Charging
Built-in Rechargeable
Internal battery — charge via micro-USB. A dead controller during a match is a forfeit. Always charge the night before.
Smart Port (bottom)
Tether Connection
Used to tether directly to the Brain for wired control — helpful for auton testing without radio or for debugging.

How the Controller Connects to the Robot

Wireless: The V5 Brain has a built-in radio. Power on the Brain, power on the controller, and they pair automatically if set to the same robot. At competitions, the field control system manages pairing.

Tethered: Connect a Smart Cable from the controller's Smart Port to the Brain. Useful for testing in the pit, debugging, or when wireless signal is unreliable.

⚠️
Before every match: Confirm the controller is paired to YOUR robot, not another team's. At competitions, multiple robots are powered on simultaneously. Check the controller LCD — it should show your robot name.

Common connection mistakes:

▶ Recommended — V5 Controller Setup & Pairing
V5 Controller Setup & Pairing video thumbnail
Tap to play · Controller pairing, tethering, and LCD display walkthrough
// Section 02
Control Mapping
How to think about button layout — and why it matters under pressure.
VEX V5 Controller diagram — use as reference when planning your team's button assignments for this season
Reference your team's control map against this layout each season

Tank Drive vs Arcade Drive

Tank Drive
Left stick = left wheels · Right stick = right wheels
More precise. Preferred by experienced drivers. Harder to learn initially.
Arcade Drive
One stick = forward/back + turn
Easier to learn. Less precise at speed. Good for beginners and simple robots.

Neither is strictly better — pick what your driver is most comfortable with after testing, and then do not change it before competition.

Mapping Best Practices

Example: Clean Beginner Competition Map

This is a starting point, not a prescription. Adjust based on your robot's mechanisms and your driver's comfort. What matters is that it's tested, consistent, and documented.
Left Joystick
Forward / Backward
Primary drive axis — most of the match
Right Joystick
Turn Left / Right
Arcade drive turning — natural and fast
L1
Intake In
Trigger position — easy hold for full driver control period
L2
Intake Out / Reverse
Directly below L1 — natural jam-clear motion
R1
Score / Deploy
Primary scoring action — right trigger for right hand dominance
R2
Lift Up / Extend
Secondary mechanism — paired with R1 for mechanism control
A
Preset Position 1
Fast lift/arm preset — one-press to scoring position
B
Preset Position 2 / Reset
Retract to drive position — automatic via code
Up / Down (D-pad)
Auton Selector
Used before match start only — won't conflict with driver control
X or Y
Reserve / Emergency Stop
Keep one button free for edge cases discovered in practice

Programming Connection

The controller layout is directly tied to your code. Programmers and drivers must review the control map together before finalizing it. After any change to the map, document it in the notebook and run a full practice session before competition.

💻
In EZ Template / PROS, controller buttons are accessed via master.get_digital(DIGITAL_R1). See the Driver Tuning Guide for input curves, deadband, and macro setup.
// Section 03
Competition Prep & Care
What to check before every match, and how to protect this tool.

Pre-Match Checklist

🎮 Before You Queue
Controller fully charged (80%+ on LCD display)Check the night before AND the morning of competition
Correct robot paired on the LCD screenVerify robot name — not another team's robot
All buttons tested in pit before queuingRun through every mapped button with the robot on the field
Both joysticks centered and responsiveNo drift, no dead zones — verify in PROS terminal or Brain screen
Driver and operator know their button assignmentsSay them out loud before walking to the field
Backup driver briefed on the control mapThey should be able to drive without asking questions
Connection tested — robot responds to joystick inputMove the joystick and confirm the robot drives — don't assume

Controller Care & Maintenance

⚠️
The controller is critical competition equipment. Treat it the same way you'd treat your auton code — protect it, test it, and never assume it's fine without checking.

How Top Teams Use the Controller Well

// Section 04
Troubleshooting
Common problems, likely causes, and quick fixes for match day.
🚫
Diagnose before you replace. Most controller problems are pairing, battery, or code issues — not hardware failure. Work through the table below before assuming the controller is broken.
ProblemLikely CauseWhat to CheckQuick Fix
Controller not connecting Wrong robot selected, or Brain not fully booted Controller LCD — does it show your robot name? Is the Brain fully on? Power-cycle Brain, wait 10 s, then power on controller
Robot not responding to joystick Controller paired but driver control not running Is the competition switch set to "Driver Control"? Is autonomous still running? Confirm competition mode is active; re-run opcontrol if testing
Wrong buttons doing wrong actions Code doesn't match the agreed control map Compare the code button assignments against your documented layout Fix the code and re-upload; update the notebook if the map changed
Joystick drift (robot moves when stick is centered) Physical wear or firmware deadband too small Check Brain screen joystick values at rest — should be near 0 Add deadband in code: if(abs(axis) < 10) axis = 0;
Low battery warning during match Controller not charged before competition LCD battery % — below 20% causes disconnects under load Charge immediately; have a second controller ready as backup
Tether cable loose / no wired connection Smart cable not fully seated Click the Smart cable firmly into both ports Seat the cable until you feel the click; try a different cable if no click
Driver confusion during match Control map changed recently, or driver under-practiced Is this the same map they practiced with all week? After match: re-review the map together, run button drills before the next round
Screen blank or not updating No code running display updates, or firmware mismatch Check if pros::lcd or custom Brain screen code is in the program Verify firmware version; re-upload and test outside of competition mode
🔬 Check for Understanding
Your robot isn't responding to the joystick during a practice run. The controller LCD shows your robot name and full battery. What should you check first?
Replace the controller — it must be broken
Check whether driver control mode is actually running — autonomous may still be active or the competition switch may be set incorrectly
Re-upload the code immediately
Add deadband to the joystick code
Correct. If the controller is paired and the battery is fine, the most common cause of an unresponsive robot is that driver control isn't running. Check the competition switch and program state before touching anything else.
// Section 05
Drills, Notebook & STEM
Practice drills for controller fluency, what to document, and the engineering connection.

Controller Practice Drills

⏱ 3 min All levels Muscle memory
Button Memory Drill
Without looking at the controller, call out each button and perform its action on the robot.
GoalEliminate button confusion under pressure SetupRobot on field, driver holding controller at side Time3 minutes — run through all mapped buttons twice PassZero hesitations on any button by the end of round 2
⏱ 5 min All levels Consistency
Pre-Match Setup Race
Time how long it takes to complete the full pre-match checklist: power on, pair, battery check, button check, confirm connection. Target: under 60 seconds.
GoalBuild a reliable pre-match routine that takes under 60 seconds SetupRobot powered off, controller unpaired, timer ready Time5 min — run 3 times, record each attempt PassAll 3 attempts under 60 seconds with no missed steps
⏱ 5 min Intermediate Communication
Driver / Operator Handoff Drill
Run a simulated driver control period. Mid-way through, the coach calls "swap" — the backup driver picks up the same controller and continues from where the primary left off without stopping the robot.
GoalEnsure backup driver can run the same control map with zero explanation needed SetupFull practice field, both drivers present Time5 min, swap at the 2:30 mark PassNo robot stoppage, no button confusion during the swap
⏱ 10 min All levels Precision
Precision Driving Grid
Place tape markers on the field in a grid pattern. Drive the robot to each marker and stop within one tile width. Focus on joystick sensitivity and throttle control — not speed.
GoalBuild fine joystick control and spatial awareness Setup6 tape markers in a 2x3 grid, robot starts at center Time10 min — complete the grid pattern 3 times PassAll stops within one tile width, no wall contacts

What to Document in the Notebook

Controller decisions are part of the engineering design process. The notebook should show that you made intentional choices — not just "this is where the buttons ended up."

⚙ STEM Highlight
Human-Centered Design & Reliability Engineering
The V5 Controller is a human-machine interface (HMI) — every design decision about button placement, sensitivity, and mapping is an application of human-centered design: designing systems around how people actually think and react under stress, not how they ideally would in a calm environment. The choice of which action gets the easiest button access is an ergonomics decision. The decision to add deadband to joystick input is a noise filtering decision rooted in signal processing. Testing with a backup driver is a redundancy check — a reliability engineering principle that asks: what happens when the primary path fails?
🎤 Interview line: "We documented how our driver gave feedback on the control layout after each practice session. When we found that L2 was accidentally pressed during fast turns, we moved that function to a face button and re-tested. The notebook shows three iterations of the control map before we locked it for competition."
Related Guides
▶ Next Step

Controller mapped and pre-match routine solid — now tune your input curves and build advanced control logic.

🏎 Driver Control Tuning →
🏎 Driver Control Tuning → 🎮 Driver Practice Curriculum → 🎮 Partner Controller → 🔍 Robot Pre-Check →
← ALL GUIDES