Override Manipulator 🤛
The Manipulation Problem in One Paragraph
Override gives you 119 scoring objects across two types: pins (small, 4 color combinations, 63 total) and cups (hollow hourglass shape, one opaque side and one transparent side, 56 total). To score, you place a pin on a goal, then stack a cup on top of the pin. The cup's orientation matters — if a pin sits in the opaque side of a cup, that color doesn't count. Your robot can hold 1 cup AND 1 pin at any given time, no more. So your manipulator has to handle two different objects with different geometries, in a specific stacking order, with an orientation requirement on the cup.
This is not a simple gripper problem. The 1-of-each possession limit means you can't build an accumulator that holds multiple pins. The two-object handoff means a single all-purpose grip might be slower than two specialized grips. The cup orientation requirement means you may need a sensor and a rotation mechanism to make sure the cup is the right way up before you place it.
The Four Architectural Choices
Almost every Override team will pick one of these four patterns:
Sections 2 and 3 unpack each architecture with build details. Sections 4–6 cover the cross-cutting design problems (cup orientation, sensors, build sequence) that affect all four.
What This Deep Dive Covers
- Game Elements — pins and cups in detail, with manipulation implications
- Four Architectures — full analysis of A, B, C, and D with pros/cons and decision framework
- Cup Orientation — the opaque/transparent problem and how to solve it
- Sensors & Vision — AprilTags, optical sensors, and what each does for you
- Build Order — what to prototype first, what to add later
- Failures & Tuning — the five most common Override manipulator failure modes
- STEM & Notebook — what concepts this teaches, plus interview lines and a quiz
Game Elements 🎯
The Pin
A pin is a small two-color object that sits inside a goal. There are 63 pins in total, in four color combinations. Pins are the primary scoring object — visible red and blue pins each count for 5 points, and yellow pins are worth either 0 or +10 depending on the Toggle in their quadrant.
| Pin Type | Count | Strategic Value |
|---|---|---|
| Red/yellow | 20 | Common. Red shows when placed correctly — 5 pts red. Yellow side gives toggle bonus potential. |
| Blue/yellow | 20 | Common. Same as above, blue alliance. |
| Yellow/yellow | 19 | Most common. Both sides yellow — only valuable when a Toggle claims the quadrant. |
| Red/blue | 4 | Extremely scarce. Both sides score for opposing alliances. Strategic resource — whichever side is showing scores 5 points for that alliance. Defensive denial of these pins is high-value. |
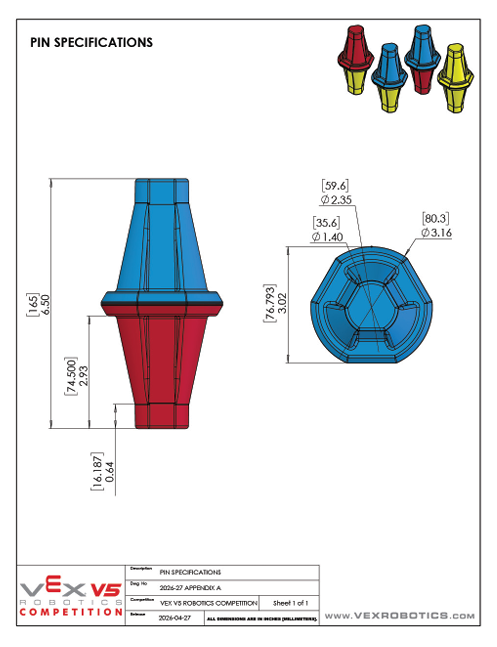
From a manipulation standpoint, all pins share the same geometry. The color combination doesn't change how you grip them — just which pin you'd want to grip in any moment. Per the v0.1 manual glossary + Appendix A Figure A5, each pin is 6.50″ (165 mm) tall, but its diameter varies along the height: 3.16″ (80 mm) at the widest base, 1.40″ (35.6 mm) at the narrowest neck, and approximately 2.35″ (60 mm) at the mid-section. There is no single "pin diameter" — an intake design that assumes one will fail when the pin enters in a different orientation. See override-intake-geometry for the manipulation implications. Each pin consists of two halves; each half is independently scored (see Per-Half Pin Scoring below). Mass is not specified in v0.1.
The Cup
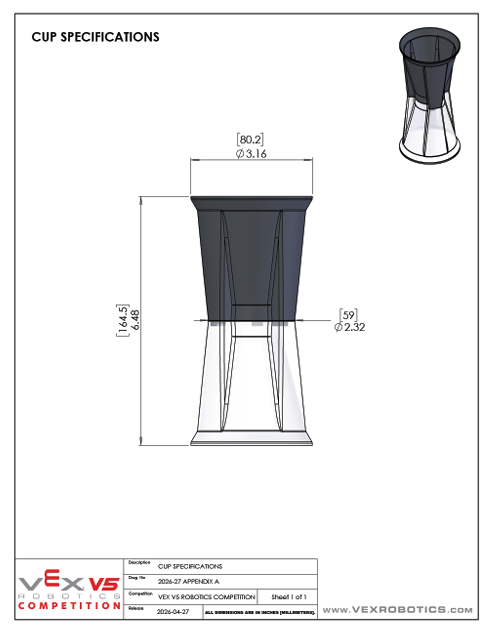
A cup is hollow with two halves — one opaque, one transparent (per the v0.1 manual glossary, approximately 3.15″ / 80mm in diameter and 6.5″ / 164.5mm tall). Cups stack on top of pins on goals. Adding a cup to a goal increases that goal's pin capacity (more cups = more pins can be stacked there). The pin and the cup are the same height (both 6.5″), which means a cup placed on a pin covers the pin's upper half exactly.
The opaque/transparent rule is the one that drives mechanism design (manual rule SC3):
- Pin half nested in the transparent half of a cup → scores
- Pin half nested in the opaque half of a cup → does not score
- Pin half not covered by a cup at all → scores
This means: if your robot places a cup with the opaque side toward the pin, the covered half scores 0 instead of 5 (or 10). Cup orientation control is mandatory, not optional. See Section 4 (Cup Orientation) for how to solve this.
It also means a defensive play exists on neutral goals: if you can't prevent an opponent from placing a pin on a neutral goal, you can top it with a cup's opaque side to hide the pin. The legality of this is narrowed by SG9 and SG10; details in Section 4.
Per-Half Pin Scoring
The manual's scoring rule (SC3) is more precise than the "visible pin = 5 points" framing from the reveal video. Each pin has two halves, and each half scores independently for the alliance whose color it shows. A half "scores" if it is either:
- Not covered by a cup at all (visible to the field), or
- Nested inside the transparent half of a cup.
A half nested inside the opaque half of a cup is hidden and does not score. So a single pin can score up to two halves at once.
The strategic implication: a pin sitting upright in a goal with no cup covering it scores both halves. A red/yellow pin in this configuration scores 5 (red) + 10 (yellow, if owned via Toggle) = 15 points from one pin. Stacking a transparent-down cup preserves both scores (both halves remain visible). Stacking an opaque-down cup hides the upper half and drops you back to 5 or 10 from that pin.
What this means for the manipulator: placement orientation matters, not just cup orientation. If your gripper can rotate the pin so the higher-value half is on top before placement (e.g., the yellow half on a red/yellow pin when your alliance owns the toggle), you can double-dip on scoring. Whether to design for this is a tradeoff: a wrist or rotation mechanism on the pin gripper adds at least one motor port (counting against the 88W total cap, see R10a) and mechanical complexity. For most teams, the simpler approach — placing pins in whatever orientation the gripper happens to capture them — is fine. Consider rotation control only if you have motor budget headroom in Subsystem 3 and your scoring strategy specifically depends on yellow-half exposure for toggle conversion.
The 1+1 Possession Limit
The reveal video states explicitly: at any given time, each robot is only allowed to possess one cup and one pin. This is the central design constraint of Override and shapes every mechanism choice.
What this means in practice:
- No magazine accumulators. A common pattern from past games — pick up many objects, drive once, score them all — is illegal here. You can hold one of each, period.
- Sequence matters. If you pick up a cup first and then can't reach a pin, you have to stack the cup on a pin that's already been placed (yours or someone else's).
- Pin must come first in the stack. A stack is "pin in goal + cup on top." Order is enforced by the geometry.
- Most efficient cycle holds both before the trip. Architecture B (dual-grip) is the only way to score a complete pin+cup stack with one field traversal.
The Goal
9 goals total. The layout per the v0.1 manual: 4 quadrants each containing 1 alliance-colored goal + 1 short neutral goal, plus 1 tall neutral goal in the center midfield. Total = 4 alliance goals (2 red, 2 blue) + 4 short neutrals (one in each quadrant) + 1 tall center neutral = 9. All goals are octagonal.
- Goal heights (manual glossary): alliance goals are 3.25″ (82.5mm) tall; short neutrals in quadrants are 5.8″ (146.5mm) tall; the tall center goal is 8.7″ (222.7mm) tall. Your manipulator's reach must accommodate the tallest goal you plan to score on.
- No stacking limit. The reveal video says "there is no limit to the number of scoring elements that are allowed to be placed on a goal." You can keep stacking pin/cup pairs arbitrarily high. The v0.1 manual does not contradict this; no explicit limit appears.
- AprilTags — pending verification. The reveal video stated AprilTags are mounted on all goals. The v0.1 manual does not mention AprilTags anywhere. Until verified by Q&A (system opens May 14, 2026) or by inspecting the game elements, design AprilTag-based autonomous as a planned capability rather than a confirmed feature. See AprilTags Deep Dive.
Four Architectures 📍
Architecture A — Sequential Single-Grip
One universal manipulator. Picks up either object. Two trips per scored stack: trip one for the pin, trip two for the cup.
What it looks like
A single gripper at the end of an arm or lift. The gripper has to be designed to hold both a pin and a cup — usually with a compliant inner surface (foam, rubber, or articulating fingers) that conforms to whatever shape it's clamping. Common implementations: a wide V-jaw with rubber pads, a passive scoop with a one-way trap, or a paired-finger gripper with adjustable spacing.
Cycle sequence
- Drive to pin source (loader, field tile, or driver station)
- Grip pin
- Drive to goal
- Place pin
- Drive to cup source
- Grip cup — orient if needed (see Section 4)
- Drive back to same goal
- Stack cup on pin
When to pick this
- Rookie team or first-year V5 build — build skill is the limiter, simplicity wins
- Your robot's strategy emphasizes other systems (drivetrain, defense, endgame) and the manipulator is "just good enough"
- You want to ship a working V1 fast and iterate to dual-grip in Phase B
- You're short on motor ports for the rest of the robot
Spartan's V1 Hero Bot will likely use Architecture A. The team's "roller-changing arm" concept fits this pattern — one mechanism that handles both objects sequentially. Phase B teams can graduate to B or C.
Architecture B — Dual-Grip
Two specialized grippers, each on its own actuator. Pick up one of each, traverse once, place both.
What it looks like
The robot has two distinct grippers. The pin gripper is small, narrow, optimized for the pin's geometry. The cup gripper is wider, often with a contoured inner surface that captures the cup's hourglass shape. The two grippers are typically stacked vertically or side-by-side on the same lift assembly — they share the lift but each has its own grip actuator.
Cycle sequence
- Drive past pin source — pin gripper engages
- Drive past cup source — cup gripper engages
- Drive to goal
- Place pin first
- Stack cup — rotate first if orientation is wrong
When to pick this
- Experienced team that has built multi-mechanism robots before
- Cycle time matters most for your strategy (high-volume scoring)
- You have motor ports to spare (typically 2 grip motors + 1 lift = 3 mechanism ports)
- Drivers can handle a more complex robot with more state to track
Architecture C — Hybrid Intake-and-Grip
A passive ground intake (rollers, compliant scoop, or chute) captures whichever object the robot drives over. An active grip extracts the captured object from the intake and places it on the goal. Object type is identified by an optical or distance sensor.
What it looks like
The bottom of the robot has an angled scoop or roller intake near the chassis floor. The robot drives over a pin or cup; the intake captures it and feeds it into a holding zone on the chassis. Above the holding zone, an arm with a single grip extracts and places. A sensor on the holding zone identifies whether it's a pin or cup, and the robot programs accordingly.
Cycle sequence
- Drive over pin source — intake captures pin
- Identify (sensor confirms it's a pin)
- Drive over cup source — intake captures cup
- Identify (sensor confirms it's a cup)
- Drive to goal
- Extract pin from holding zone, place on goal
- Extract cup, orient, stack on pin
When to pick this
- You want fast field-pickup without precise alignment (common in chaotic match flow)
- You have programming bandwidth for sensor logic and state management
- You don't have the build skill for two precision grippers (Arch B) but want better cycle time than Arch A
- You want a competitive Phase B robot that simplifies pickup at the cost of some placement complexity
Architecture D — Continuous Roller-Pinch (Compression Intake)
Two opposed flex wheels mounted at the end of a lift arm, rotating inward to compress and grip a single element. The same wheel pair handles both pins and cups via a configurable gap (~1.65″ for the pin mid-section, ~1.50″ for the cup base) tuned for one element type per match. Reverse the motor to outtake.
What it looks like
Two 3″ flex wheels mounted on a single shared shaft system at the end of a 4-bar lift. Wheels rotate inward toward each other (gear-coupled from one motor). Robot drives over the element; the rollers grab the element at its mid-section as the lift descends. Lift carries the element to scoring height; reverse the motor to release into the goal. See override-intake-geometry for the Gap = S − D math and 3″ vs 2″ flex wheel trade-offs.
Cycle sequence
- Drive over pin (or cup) source — rollers grab the element automatically as the wheels rotate inward
- Lift the arm; element stays compressed between the rollers
- Drive to goal; element held throughout the trip
- Position over goal; reverse motor; element drops onto goal
- Repeat for the second element type (pin then cup, or cup then pin)
When to pick this
- Your team prioritizes pickup speed and driver simplicity over peak cycle count
- Strategy emphasizes dense pin-cycling within a single quadrant rather than full-field pin-then-cup runs
- Rookie-friendly — grip alignment is forgiving (rollers grab as the robot drives over the element, no precise positioning required)
- You're willing to budget flex wheel replacement as part of mid-season maintenance (rubber wears with use)
- You don't need a top-down rim grip on cups (compression at the cup base works but is less reliable than claw-on-rim approaches)
Architecture E — Pneumatic Side-Grab (Cup-Optimized) · new May 2026
Architecture E uses two opposed flex wheels mounted on scissor arms that compress the cup at its waist (around the full perimeter, not just top-and-bottom). A pneumatic cylinder spreads the arms to release; a return spring holds them closed by default. Default-closed = if you lose air pressure, you still hold the cup.

Compression force calculation
For a cup of mass m = 78 g (Measured value, May 2026 — see payload-design for source and methodology) with waist diameter 1.5″:
| Wheel durometer | Friction μ on plastic cup | Required normal force per wheel (78 g cup, 10× safety factor) |
|---|---|---|
| Black (65A) — hard | ~0.3 | 25.5 N (~5.7 lbf) |
| Dark gray (45A) — medium ← recommended | ~0.5 | 15.3 N (~3.4 lbf) |
| Light gray (35A) — soft | ~0.8 | 9.6 N (~2.1 lbf) |
Why dark gray (45A), 3″ diameter
- Why not light gray (35A)? Highest grip but soft compounds wear faster against repeated cup contact and tend to grab too aggressively at first contact — rollers can briefly trap a cup before fully seating it, causing misalignment. Vulnerable to defensive contact.
- Why not black (65A)? Most durable, lowest grip on smooth plastics. You can compensate with higher compression but you’re fighting the material — risk of slipping under dynamic load is real.
- Why dark gray (45A)? Goldilocks zone. μ ≈ 0.5 on cup plastic, deforms predictably (~2.5 lbf for 1/4″ compression at 3″ diameter), durable enough for full season. Most common pick on top V5RC bots for similar mechanisms.
- Why 3″ diameter (vs 2″ or 4″)? Contact patch grows roughly with √(diameter × compression) — 3″ gives ~40% more grip area than 2″ at the same compression depth. 4″ is heavy and creates packaging problems on a Clawbot or compact V1. 3″ is the sweet spot for hand-sized elements.
Compression depth target
For dark gray 3″ flex wheels gripping a 1.5″-waist cup:
| Wheel-to-wheel gap | Compression per side | Grip force per side | Behavior |
|---|---|---|---|
| 1.50″ | 0″ (just touching) | ~0 N | Cup falls out |
| 1.375″ | 0.0625″ (1.6 mm) | ~5 N | Light grip, may slip on contact |
| 1.25″ ← recommended | 0.125″ (3.2 mm) | ~10 N | Secure grip, no damage |
| 1.125″ | 0.1875″ (4.8 mm) | ~15 N | Aggressive grip, may damage cup over time |
| 1.00″ | 0.25″ (6.4 mm) | ~20 N | Too much — cup deformation risk |
Pneumatic cylinder selection
For 0.5″ required arm spread at <5 lbf force needed:
| VEX cylinder | Stroke | Force at 100 PSI | Verdict |
|---|---|---|---|
| 0.5″ stroke single-acting | 0.5″ | ~44 lbf | Too tight — no margin for design adjustments |
| 1.0″ stroke single-acting ← recommended | 1.0″ | ~44 lbf | 2× margin on stroke, plenty of force |
| 2.0″ stroke double-acting | 2.0″ | ~44 lbf | Overkill, packages awkwardly |
Configuration: single-acting, normally extended (= closed/gripping by spring), air pulse retracts to release.
- Default closed = grip — lose pressure and you still hold the cup. Safer.
- Single-acting — half the air consumption of double-acting. With V5RC’s limited air budget, this matters.
- 1″ stroke gives geometric margin if the team needs to adjust arm geometry mid-season.
Scissor arm geometry
- Front arm length (pivot to wheel center): 4″ — gives space for wheel mounting and clearance
- Back arm length (pivot to piston attachment): 4″ — equal length means 1:1 motion ratio (0.5″ piston travel = 0.5″ wheel spread)
- Pivot angle change (closed → open): ~3.6° per arm — small, no stress on the pivot
- Piston-to-arm attachment: clevis joint at the back end of each arm
Cycle sequence
- Approach loader with arms open (cylinder extended, wheels at 1.75″ gap)
- Position cup between the wheels at the correct height for the loader
- Vent the cylinder — spring snaps arms closed, wheels compress cup at 1.25″ gap (~30-50 ms)
- Drive to goal; cup held throughout the trip even on defensive contact
- Position over goal; pulse the cylinder — arms open, cup drops onto goal
- Cylinder vents again, spring re-closes arms ready for next cup
When to pick this
- Strategy emphasizes cup cycling as the primary scoring mechanism
- Team has working pneumatics knowledge (or is willing to learn — less complex than other pneumatic systems but still requires care)
- Driver wants fast release timing (pneumatic ~30-50ms vs roller-reverse ~150-300ms)
- Robot has air budget — budget for ~50-80 release cycles per match on a single 100 PSI tank
- Defensive matches expected — the side-grab is much more resistant to walkout than top-pinch
Caveats
- Cup mass estimate (50 g) is approximate. Verify against the actual Override element. If cups are 80-100 g, tighten the closed-gap setpoint to ~1.18″ for the same 10× safety margin.
- This is cup-optimized. Architecture E doesn’t handle pins well — pins are smaller diameter and want a different grip geometry. Teams running pin-heavy strategies should stay with Architecture D or the original A/B/C variants.
- Pneumatics add a failure mode: leaks, regulator issues, valve sticking. Teams new to pneumatics should expect 1-2 sessions debugging air-system issues before reliable operation.
Decision Matrix
| Question | Arch A (Single) | Arch B (Dual) | Arch C (Hybrid) | Arch D (Roller-Pinch) |
|---|---|---|---|---|
| How many motor ports for the manipulator? | 1 | 2 | 2 | 1 |
| Build complexity (1=easy, 5=hard) | 2 | 4 | 3 | 2 |
| Programming complexity (1=easy, 5=hard) | 2 | 3 | 4 | 2 |
| Average cycle time per pin+cup stack | Slowest | Fastest | Medium | Fast pickup, sequential transport |
| Pickup precision required | High | High | Low | Low |
| Driver workload | Lowest | Highest | Medium | Lowest |
| Prototype risk if first attempt fails | Low — easy to fix | High — redesign costs time | Medium | Low — few moving parts |
| Mid-season maintenance burden | Low | Medium | Medium | Higher (flex wheel wear) |
For Spartan's 6-team program with mixed experience levels, the recommendation depends on team-by-team skill: rookies to Architecture A or D, experienced returners to B or C. Cross-team consistency is less important here than for the drivetrain — teams can have different manipulator architectures without breaking shared learning. Architecture D is a particularly strong fit for rookie squads inheriting V1 hero bots after the 8th-graders graduate, since the forgiving pickup makes driver onboarding faster.
Cup Orientation 🔲
Why Cup Orientation Matters
The reveal video is explicit: "placing a pin into the opaque side of a cup prevents that color from being scored." This means a cup placed wrong-way-up on a pin is the same as not placing a cup at all (from a scoring standpoint). Worse, if you do this on every cup placement, you score zero points from your cup work for the entire match.
Your manipulator must do one of three things to handle this:
- Always pick up cups in a known orientation — if cups always come out of the loader transparent-side-up, then your gripper just maintains that orientation through placement. Easiest solution.
- Detect orientation, rotate if wrong — sensor identifies opaque vs transparent side, gripper rotates the cup before placement if it's wrong. Most robust but most complex.
- Always rotate to a known state — gripper always rotates the cup 0 degrees or 180 degrees before placement to match a fixed reference. Simpler than detection but assumes you know the starting orientation.
Which option you pick depends on how cups are presented to your robot. We don't yet know the loader mechanics from the manual — if loaders deliver cups in a known orientation, Option 1 works. If cups can come from the field in any orientation (e.g., descored from another team's goal), Option 2 is necessary.
Detecting Cup Orientation
Two viable sensor approaches:
- Optical sensor (V5 Optical 276-7405). Mount facing the cup's grip area. Detects color/brightness difference between opaque and transparent sides. The transparent side will read as "ambient" (whatever is behind the cup); the opaque side will read as the cup's solid color. Tunable threshold determines orientation. See Optical Sensor Deep Dive.
- Distance sensor. Mount facing the cup's grip area. The transparent side passes some IR light through; the opaque side reflects more. Distance reading differs between the two sides. Less reliable than optical for this specific case.
Optical is the standard answer here. It's purpose-built for color/material discrimination and the opaque/transparent distinction is exactly the kind of contrast it was designed for.
Rotating the Cup
If your sensor detects the cup is wrong-way-up, your gripper needs to flip it. Three implementation patterns:
Defensive Cup Placement
The flip side of the orientation rule is that you can deliberately place a cup wrong-way-up over an opponent's pin to hide its color. The v0.1 manual narrows where this is legal:
- On neutral goals (5 of 9 goals): placing a cup over an opponent's pin is legal — placing is not removing. Wrong-way-up cup placement here is a real defensive play.
- On opposing alliance-colored goals: illegal. Per SG9, robots may not directly or indirectly interact with opposing alliance-colored goals at all — placing OR removing.
- On your own alliance-colored goals: moot. Opponents shouldn't have pins there in the first place (SG9 protects your goals from them too).
So the defensive play exists, but it's scoped to neutral goals. The implementation is the same hardware as orientation correction — just used inverted. The driver or autonomous routine needs a mode that deliberately flips cup orientation when scoring on a neutral goal where the opponent has already placed.
Note SG10 also blocks the symmetric move: you cannot remove an opponent's pin from a neutral or opposing goal. Your defensive options are limited to adding on neutral goals, not subtracting anywhere.
Sensors & Vision 🔮
Vision & AprilTags — pending
The Override v0.1 manual does not mention AprilTags anywhere in its 163 pages. The reveal video stated AprilTags are mounted on all goals; the manual neither confirms nor denies. Until verified via Q&A (system opens May 14, 2026) or by inspecting the game elements when they arrive, treat AprilTag-based autonomous as a designed-for capability rather than a confirmed feature.
What the manual does say (GDC philosophy letter, p13–14): "Tools like AI Vision Sensors and Optical Sensors can help your Robot: Identify objects, Interact with Toggles, Navigate the Field." So the AI Vision Sensor (276-8659) is GDC-recommended for object identification and toggle interaction regardless of AprilTag status — you can use color-blob detection, shape recognition, or AprilTag detection depending on what the field actually provides.
If AprilTags are confirmed, the AI Vision Sensor reads up to 38 distinct IDs (numbered 0–37) within a ~73° field of view. Tag-to-goal mapping would need to be discovered or published.
Recommended posture: design the manipulator's programming to support both AprilTag-based and color/shape-based alignment, with AprilTag as the preferred path if confirmed. See AprilTags Deep Dive for integration patterns.
Optical Sensor for Cup Orientation
As discussed in Section 4, the V5 Optical Sensor (276-7405) is the right tool for opaque/transparent discrimination. Mount it inside the cup gripper, facing the inner surface of the captured cup.
Tuning:
- Brightness threshold — transparent side reads through to ambient/whatever is behind; opaque side reflects bright cup color. Set threshold based on your specific cup color and ambient lighting.
- Calibration ritual — before each match, run a calibration that captures the "clearly opaque" reading and the "clearly transparent" reading. The midpoint is your threshold.
- Multi-sample averaging — take 5–10 readings and average. Single readings can flicker due to ambient light changes; averaged readings are stable.
Distance Sensor for Goal Alignment
For close-range goal alignment (the last 6″-12″ before placement), a distance sensor often beats vision. Mount one facing forward on the manipulator. Drive to within sensor range of the goal, then close the loop on distance:
- Coarse approach: AprilTag-based heading and approximate distance via vision.
- Fine approach: distance sensor confirms exact distance from manipulator face to goal rim.
- Place: motor commands placement only when distance is in a tight tolerance (e.g., 2″ ± 0.5″).
This is the standard sensor stack for VEX manipulators that need both global navigation and local precision.
Color Sensor for Pin Identification
If your manipulator picks up pins one at a time and you want to identify which pin you're holding (for strategic decisions: e.g., is this a red/blue dual or a yellow/yellow?), a color sensor on the gripper interior reads the pin's color combination.
This is optional. Many teams skip it and let the driver visually verify before pickup. Depends on your cycle time and driver workload tolerance.
Sensor Stack Summary
For a competitive Override manipulator, the typical sensor configuration is:
| Sensor | Role | Required? |
|---|---|---|
| AI Vision Sensor | Object ID, toggle interaction, goal alignment (per GDC letter, p13–14) | Highly recommended — auton scoring leans on it |
| Optical Sensor | Cup orientation detection | Required if not using pre-pickup orientation |
| Distance Sensor | Final alignment to goal | Optional — nice-to-have |
| Color Sensor | Pin color identification | Optional — for strategic awareness |
| IMU | Heading & turning accuracy | Required for chassis (universal) |
Build Order 🛠
The temptation with manipulators is to build the whole thing at once. Don't. Override's manipulator has at least three independent design problems (pin grip, cup grip, orientation control) and stacking them all at once means you can't debug any of them. Build in stages, test at each stage.
Failures & Tuning ⚠
Match-Day Tuning Sequence
- Calibrate optical sensor against ambient lighting at the venue. Field lighting differs from your build space.
- Verify AprilTag detection at the actual goal positions. Some venues have lighting that makes tag detection unreliable.
- Test grip force with a fresh battery. Battery sag during practice can hide grip force issues that emerge mid-match.
- Time a full cycle in match conditions. Cycle time longer than 8 seconds means you score 8–10 stacks per match instead of 12–15. Look for what's slow.
- Practice cup orientation correction as a separate skill. Have a teammate hand you cups in random orientations; verify your robot always places transparent-side-up.
STEM & Notebook 📚
STEM Highlight — Engineering Tradeoffs
The Override manipulator decision is a clear example of engineering tradeoffs — the engineering principle that you usually can't get everything you want at once. Each architecture trades one thing against another:
Architecture A trades cycle speed (slower) for simplicity (easier to build). Architecture B trades simplicity (more complex) for cycle speed (faster). Architecture C trades both partially — faster pickup at the cost of programming complexity. There's no single "best" answer because the right choice depends on what your team values most.
Engineers face this constantly. A faster car uses more fuel. A lighter phone has less battery life. A cheaper material is less durable. Recognizing the tradeoff and choosing deliberately — rather than pretending one answer is always right — is what good engineering looks like. The decision matrix in Section 3 is what real engineers use to make these choices: list the things you care about, score each option, pick the one that wins on the things that matter most to you.
Interview Talking Points
How we picked our architecture: "Override has a 1-cup-and-1-pin possession limit, so we couldn't use a magazine accumulator. We had to choose between three patterns: a single grip that handles both objects (slower but simpler), two specialized grips (faster but more complex), or a hybrid intake design. We went with [your choice] because [your reasons]. The tradeoff was [what you gave up]."
The cup orientation problem: "The cup has an opaque side and a transparent side. If we place a pin into the opaque side, the pin's color doesn't score. So the manipulator has to control cup orientation. You can use [optical sensor / pre-pickup approach / pneumatic flip] to make sure every cup we place has the transparent side toward the pin. Without this, we'd score zero points from our cups."
Why our choice fits our team: "We're a [first-year / experienced] team with [N] motor ports available after the drivetrain. Our match strategy emphasizes [cycle speed / defense / endgame]. Architecture [A/B/C] fits our skill level and strategy because [your reasoning]. If we were a different team, we might pick differently — that's the point of an engineering decision matrix."
Check for Understanding
Why: The bottleneck in Architecture A is the two field traversals per stack. Switching to dual-grip cuts that to one traversal — potentially halving cycle time. A faster motor doesn't help because the gripper isn't the slow part; the drivetrain traversal is. Higher torque doesn't help unless the gripper is failing to grip (it's not). And adding a third possession slot is illegal — the 1+1 rule is a hard rule.
What to Put in Your Engineering Notebook
- The architecture decision matrix. Show the comparison from Section 3. Write down the team values you weighted. Show why the chosen architecture won.
- Cup orientation sensor calibration data. Optical sensor readings for opaque side vs transparent side, your threshold, how it differed across lighting conditions. Numbers and graphs are notebook gold.
- Cycle time evolution. Track cycle time as you iterate. The graph that shows 14 sec → 11 sec → 8 sec across iterations is exactly what judges want to see.
- Failure log. Every time the manipulator failed during testing, note what happened, what you changed, and whether it worked. This is the "iteration" story judges look for.
- The 1+1 possession limit constraint. Document how you ensure the robot doesn't accidentally exceed the limit. This shows judges you read the rules carefully.