Override Endgame — The Final 10 Seconds ⌛
What Actually Happens in the Last 10 Seconds
At 10 seconds remaining, robots fight to be inside the midfield boundary. Robots in the boundary at clock-zero score points. Robots also push opponents out. Per SG12.2, the manual explicitly authorizes "vigorous interactions" in this zone — this is the contact-heavy zone of the match.
The Two Things You're Fighting For
| Reward | Value | How Earned |
|---|---|---|
| Per-robot endgame bonus | +8 points per robot in the boundary at clock-zero | Be inside the midfield boundary at the buzzer (SG12) |
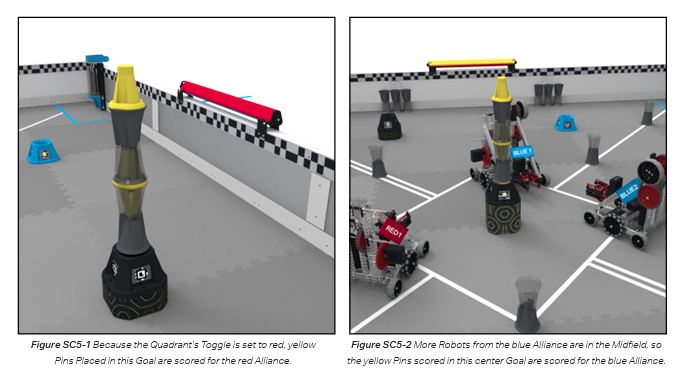
| Center-goal yellow claim | All yellow-pin points scored on the tall center goal | Your alliance has the most robots inside the boundary at clock-zero (SG12) |
The center-goal yellow claim is the bigger lever. A center goal loaded with 4 yellow-yellow pins (8 visible yellow halves) and a red toggle active means 8 × 10 = 80 points. Whoever wins the endgame claims those.
Comparison to Past Seasons
| Season | Endgame Type | Mechanism |
|---|---|---|
| Push Back 2025-26 | Parking + elevation bonuses, last 30s | Climbing or parking |
| High Stakes 2024-25 | Climbing/elevation | Hang, parking pole grab |
| In The Zone 2017-18 | Mobile goal placement, no climbing | Lift + drive |
| Override 2026-27 | Positional fight in midfield, last 10s | Drivetrain + height collapse |
Midfield Mechanics 🎯
The Midfield Boundary
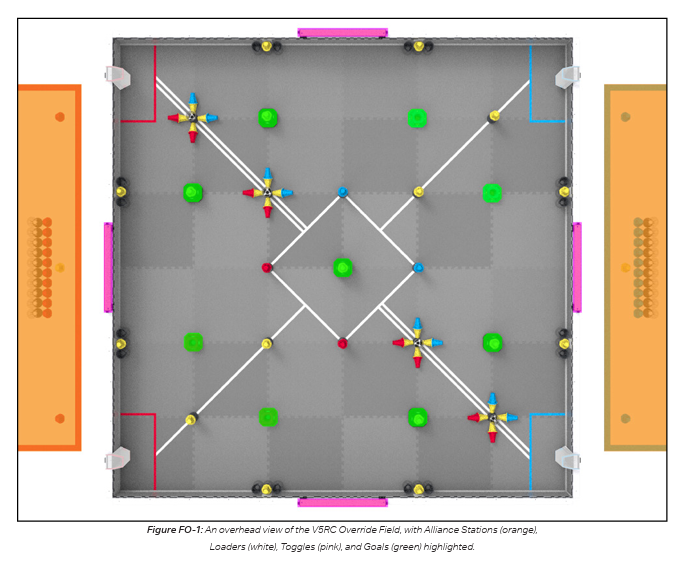
The midfield is a defined zone in the center of the field. SG12 uses the phrase "the infinite 3D vertical projection of the Midfield" — meaning the boundary extends straight up. If your robot's footprint overlaps the midfield zone, your robot is "in the midfield" for endgame purposes regardless of height.
When Endgame Rules Kick In
Per the Glossary and SG12, the endgame phase is the last 10 seconds of the match. There's an internal manual contradiction (the GDC philosophy letter writes "Final 20 Seconds" — we believe this is an editorial holdover; Glossary + SG12 are authoritative). Plan for 10 seconds.
The 18″ Height Limit (SG12.1)
Any robot inside the midfield projection during the last 10 seconds is limited to 18″ vertical expansion. Outside the midfield, the normal 50″ pre-endgame limit (SG3) still applies during those same 10 seconds.
Practical effect: if your robot was working at 30″ tall (e.g., extended arm reaching the tall center goal) at 0:11, you have until 0:10 to either (a) collapse to 18″ before entering the midfield, or (b) stay outside the midfield boundary.
What "Inside the Boundary" Counts As
Manual phrasing is "partially or entirely within the infinite 3D vertical projection of the Midfield" (SG12.1). So:
| Robot State | Counts as Inside? |
|---|---|
| Fully within midfield boundary footprint | Yes |
| One bumper over the boundary line | Yes ("partially within") |
| Bumpers entirely outside, but a deployable arm is inside | Yes (3D vertical projection includes the arm) |
| Robot fully outside boundary, no parts overlap | No |
Height Collapse 🤍
The Collapse Problem
During the match (0:00 to 1:50), the arm or lift can extend up to 50″ (SG3). A team scoring on the tall center goal (8.7″ tall) typically has the arm raised much higher to clear the goal opening — potentially 30″ or more.
At 1:50, the endgame phase begins. Within 10 seconds, any robot that wants to be inside the midfield boundary at clock-zero must have all of its 3D projection at or below 18″. If your arm is currently at 30″, you need to drop it 12″ in 10 seconds — which is plenty of time mechanically, but only if the mechanism actually collapses.
Three Collapse Mechanisms
- Simplest: just call
arm.move_absolute(ARM_GROUND, 100)at 0:11. - Speed depends on arm gear ratio. With a red cartridge (100 RPM, high torque) and modest gear reduction, dropping a heavy arm 30″ takes 3-5 seconds — safely within the 10s window.
- Pro: no extra hardware. Con: arm motor must not be doing anything else during those seconds.
- Mechanism is set up so gravity + a release spring brings it down quickly when motor stops holding.
- Cut motor power at 0:11, arm falls.
- Pro: very fast collapse (under 1 second possible). Con: requires careful spring tuning so the arm can still raise normally during the match without overpowering the motor.
- A pneumatic latch holds the arm raised. Fire the solenoid at 0:11, the latch releases, the arm falls.
- Pro: instant release. Con: more hardware (piston, solenoid, ADI port). Adds complexity to a mechanism that already works without it.
Programming the Collapse
For Pattern A (powered lower), the simplest collapse trigger is a time-based check in opcontrol:
This auto-collapses at 1:50 (110,000ms after match start). Driver can also trigger manually with a button press if they want to commit earlier.
Decision Matrix 🧐
The Three Endgame Roles
- When: Your alliance is winning the center goal yellow loading and needs to defend it. Or you're tied/behind and the center yellow claim is the swing point.
- How: Collapse arm to ≤18″, drive in, push opponents out (or refuse to be pushed out yourself).
- Risk: If you get pushed out, you lose your +8 robot bonus AND the center claim if your partner doesn't cover. SG12.2 says you should expect contact damage; your robot needs to survive vigorous interactions.
- When: You're ahead on score, just need to deny the opposing alliance the +8 each and the center yellow claim. Don't need to score more, just need to occupy.
- How: Collapse arm, drive in, set drive brake to HOLD, point your bumpers toward whoever's pushing.
- Risk: If you collapsed too early, you lost potential scoring time. If you collapsed too late, you might not make it to the boundary.
- When: Your alliance partner can win the midfield alone (or with help), AND there are remaining points to grab on alliance/quadrant goals.
- How: Stay near alliance/quadrant goals. Keep arm extended. Place final pins / cups in the last 10 seconds.
- Risk: Your partner may get pushed out, costing the +8 bonus AND the center claim. Coordinate this on the radio.
Decision Tree
| Condition | Recommended Role |
|---|---|
| Center goal has 4+ yellow halves visible AND your toggle is active | Push — defending 40+ points |
| Center goal has 4+ yellow halves visible AND opponent toggle is active | Push hard — flipping who claims those 40+ |
| Center goal yellow loading is light (< 4 halves) | One robot Hold, other Stay Outside |
| You're behind by 30+ points AND center has high yellow loading | Both robots Push — this is your only path to win |
| You're ahead by 30+ points | One robot Hold, other Stay Outside — protect the lead |
| Both alliance partners have incompatible mechanisms (e.g., neither can collapse) | Both Stay Outside — cede the +16 endgame and yellow claim, score quadrants instead |
Communication Plan
The endgame role decision depends on live information your driver doesn't have time to compute under pressure. Practice this in advance:
- Pre-match (during alliance huddle): Decide the default endgame split (e.g., "A1 holds midfield, A2 stays outside") and commit to it.
- At 0:30 remaining: Driver assesses: are we ahead? Yellow loading on center? Do we need to change plans?
- At 0:15 remaining: Final commit. Driver calls the role on the radio ("Pushing," "Holding," "Staying out").
- At 0:11 remaining: Robots execute. Don't change plans after this point.
Drive & Mechanism Implications ⚙
Drivetrain Selection — Speed vs. Pushing Power
The Override Drivetrain Decision presents two main configurations:
- Option A: 4×11W blue (44W) — faster top speed, simpler. Good for cycling many pins.
- Option B: 4×11W green + 2×5.5W half motors (55W) — more torque, slightly slower. Better for pushing in the endgame.
Teams committing to the Stay Outside role (their partner handles midfield) can stick with Option A for cycling efficiency.
Mechanism Implications
| Subsystem | Endgame Constraint | Design Response |
|---|---|---|
| Arm/Lift | Must collapse to ≤18″ in 10s if entering midfield | Pattern A (powered lower) is simplest. See Section 03. |
| Drivetrain | Must hold position against contact | HOLD brake mode for endgame. Wider wheelbase = more stability. |
| Manipulator | Possession may persist into endgame | Holding 1 pin + 1 cup at clock-zero is fine; placing them just before is better. |
| Bumpers | Take direct impact during contact | Bumper compliance matters. Standard VEX bumpers are sufficient if mounted firmly. |
Code Structure
The advanced-robot Chapter 1 endgame note introduces the SG12 callout. The Chapter 6 integration shows the basic auton template. For the endgame transition during driver control, here's the recommended pattern:
The driver-commit gate keeps the robot from auto-collapsing if the alliance plan was "stay outside." Driver presses X when they want to commit to the midfield.
Practice Protocol
- Time the collapse. Run 10 collapse sequences from full height. Target: under 5 seconds. If it takes 8+, your mechanism is too slow.
- Drill the boundary commit. From 8 different starting positions on the field, drive to the midfield boundary. Time each path. Plan paths under 4 seconds.
- Practice contact. Have a partner robot push yours from each direction at full speed. Verify your bumpers and frame don't shift, your arm doesn't flop, and your wheels don't skip.
- Run full match sims. Every full match practice ends with the endgame transition. Don't separate it; integrate it.
- Coordinate with your scouting partner. When you're scouting future opponents, note their endgame: do they push? hold? stay outside? Your alliance plan changes based on opponent's expected role.