Why Secondary Mechanisms Matter ⚡
The Two Mechanisms in One Glance
Why Toggles Matter (V1 Priority)
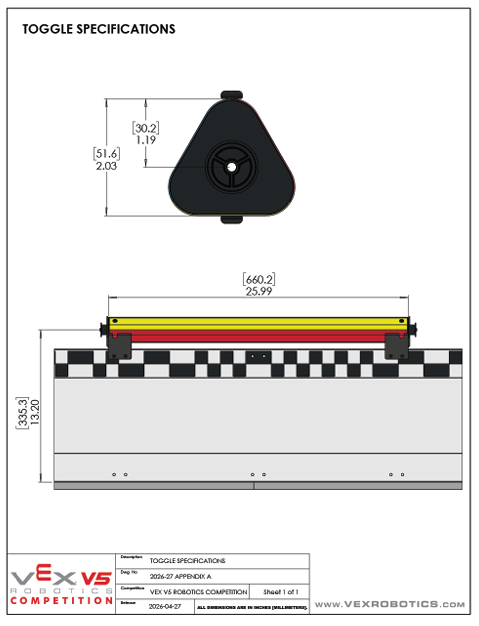
Yellow halves are 78 of 126 pin halves — 62% of all pin halves on the field. By default they are worth 0 points each. A toggle in the matching alliance color converts every visible yellow half in that quadrant to +10 points. SC5
That makes the toggle flipper one of the highest-leverage non-required mechanisms a V1 robot can have. A team that can reliably flip toggles to its color in 1-2 quadrants per match will out-score a team that can't, even if their main manipulator is otherwise comparable.
Why Pin Rotation Matters (V2 Polish)
The pin rotator addresses a different problem: when an opponent (or your own miss) leaves a pin placed on a goal in the wrong orientation, the wrong color half is upward and scoring for the wrong alliance. Rather than de-scoring and re-placing (which costs cycle time), a 180° wrist rotation flips the pin's orientation in place.
This is V2 because: (a) it requires the V1 manipulator already exists to add a wrist motor onto, and (b) early-season matches don't have enough wrong-orientation pins on goals for it to pay off. By mid-season, opponent defense and missed placements make this a real opportunity.
V1: Toggle Flipper 🏁
The Mechanism
Inspired by the Spin Up roller mechanism: a small spinning wheel pressed against the toggle face flips it through friction. Mounted on its own short post at the chassis far end (right edge in side view, the side adjacent to the wall when the robot is in flipping position) so that the entire mechanism stays compact and doesn't consume the horizontal expansion budget reserved for the main pin/cup manipulator.
| Component | Purpose | Notes |
|---|---|---|
| V5 wheel | Friction surface that spins the toggle | ~3″ diameter green V5 wheel. Edge contact with toggle face. |
| V5 11W motor | Drives the wheel | Counts toward the 88W non-drive cap (R10a). Small motor footprint. |
| V5 Optical Sensor | Reads toggle face color | Mounted on post just below wheel, view ray pointed at toggle face. Stops motor when desired color is up. |
| Dedicated post | Mounting structure at chassis far end | Vertical post at the chassis right edge (the side adjacent to wall). Saves horizontal expansion for the main manipulator. |
Cycle
- Drive parallel to the wall, near the target toggle.
- Position chassis so the wheel contacts the toggle face.
- Activate the motor — wheel friction rotates the toggle.
- Optical sensor continuously reads the upward toggle face color.
- When sensor reads desired color, stop motor and drive away.
Pros
- Tower-mounted on its own post: doesn't compete with manipulator for horizontal expansion.
- Spin Up roller pattern is well-proven in V5RC; team has prior reference designs to draw from.
- Color sensor enables precise stop at the desired face — no overshoot.
- Clean handling of SC4 (toggle face must be parallel with mounts at rest, robot not in contact with toggle at match end): drive away when done, problem solved.
Cons / Watch-outs
- Costs 1 motor + 1 sensor in the budget. Plan motor allocation early.
- Robot must drive close to wall reliably; if alignment is off, wheel doesn't contact toggle face.
- Wheel slip on smooth toggle face is possible — consider a high-friction wheel or surface treatment.
- Optical sensor requires ambient-light tuning during practice. Calibrate at the venue.
V2: Pin Rotator 🔄
The Idea
The V1 manipulator (tower + 4-bar + V5 horizontal claw) already grips pins. The V2 evolution adds a single wrist motor at the carriage-to-claw joint, providing a 180° rotation degree of freedom. With that one addition:
- Claw grips a wrong-orientation pin off a goal.
- 4-bar lifts pin slightly off the goal mount.
- Wrist motor rotates claw (and pin) 180°.
- 4-bar lowers pin back onto goal in the corrected orientation.
No new claw fabrication, no new pickup mechanism. Just one extra motor and one extra control loop.
Pros
- Smallest possible step from V1: same claw, just adds a wrist.
- Recovers from wrong-orientation drops without de-scoring.
- Counters opponent defensive placements that intentionally orient pins wrong-color-up.
- Same claw handles both pickup and rotation — minimal mechanism complexity.
Cons / Watch-outs
- V2 capability — defer until V1 is solid and proven on-field.
- Costs 1 extra motor (within 88W non-drive cap, R10a).
- Precise pin pickup is required. If the claw misaligns, the rotation makes things worse, not better.
- Claw fabrication is harder with the wrist actuator integrated. Plan the geometry early.
V3: Polished Design — Unified Secondary Stack ✨
What "Polished" Actually Means
By state competition, three things separate a polished V3 secondary stack from V1+V2 stacked together:
- Pneumatic toggle flipper — replace the V1 motor + V5 wheel post with a pneumatic flicker. 0W motor budget, faster actuation, fewer parts to break. (See “Pneumatic Flipper” below.)
- Integrated wrist with optical orientation — combine the V2 wrist motor with an Optical Sensor and code the rotation as automatic on-pickup, not driver-triggered. Driver picks up the pin; the manipulator decides whether to rotate before placement. (See “Auto-Rotate Pickup” below.)
- Sensor consolidation — the V1 toggle flipper had its own dedicated Optical Sensor; V2 pin rotator added a second one near the claw. V3 merges these into a single manipulator-mounted Optical that handles both jobs depending on robot state.
Polish #1 — Pneumatic Toggle Flipper
The V1 toggle flipper used a motor + V5 wheel pressed against the toggle face. Reliable, but spends 11W of the 88W R10a budget and requires the wheel to maintain contact during the flip motion.
V3 replaces this with a pneumatic flicker:
- Single-acting cylinder (3″ or 4″ stroke) mounted at chassis far end on a vertical post.
- Rubber-tipped standoff at the cylinder rod end (preserves toggle surface; high friction prevents slippage).
- Trigger condition: drive past the wall toggle with the cylinder aligned to the toggle's rotation axis; fire on driver button press.
- Reset: cylinder retracts via internal spring (single-acting); ready for next match instantly.
Watts saved: 11W returned to the 88W budget for arm or future expansion.
Cycle time: ~150ms cylinder fire + retract. Compared to the V1 motor + wheel, which needed ~400ms of contact + spin-up, this is roughly 2.5× faster.
Air budget: single-acting cylinder consumes ~2 cubic inches of air per fire. With a standard 100psi VEX air reservoir, you get roughly 30 fires per fill — well above any one match's toggle-flip count.
Polish #2 — Auto-Rotate Pickup
The V2 wrist rotator was driver-triggered: driver picks up pin, sees orientation, presses button to rotate. V3 makes this automatic.
The key insight: with an Optical Sensor mounted at the manipulator's pickup zone, the robot can detect pin orientation during pickup and decide whether the wrist motor needs to engage before the lift even rises. Driver presses one button ("pickup pin"); the manipulator handles orientation correction transparently.
Implementation:
- Optical Sensor mounted on the claw, looking down into the gripped element.
- Pickup macro reads sensor color: alliance-color top-half = correct (no rotation); opposite-color top-half = rotate.
- Wrist motor commanded to 180° or 0° based on sensor read; driver sees indicator on controller screen but doesn't need to act.
- Place macro is unchanged from V2.
Driver workload reduction: the V2 driver had to think "is this pin oriented right? Should I rotate?" on every pickup. V3 driver thinks "pickup, place" — same as V1 — and orientation correction happens transparently.
Watt cost: unchanged from V2. Same wrist motor; the polish is in the code path, not the hardware.
Polish #3 — Sensor Consolidation
V1 had a dedicated Optical Sensor on the toggle flipper post (to confirm toggle color before flipping). V2 added a second Optical Sensor on the claw (for pin orientation).
By V3, the toggle flipper is pneumatic and triggered manually — the dedicated toggle Optical isn't needed. The single manipulator-mounted Optical from Polish #2 covers both jobs:
- During pin/cup pickup: reads element top-half color for orientation.
- During toggle approach: reads toggle face color; controller LED confirms before driver fires the pneumatic.
Net: one fewer sensor on the robot, one fewer wire run, one fewer mounting point to fail.
V3 Motor & Port Budget
| Mechanism | Motor Power | Smart Port | Pneumatic |
|---|---|---|---|
| 4-bar lift (Architecture A) | 11W | 1 | — |
| V5 horizontal claw | 11W | 1 | — |
| Wrist (V2 carry-over, auto-rotate code) | 11W | 1 | — |
| Toggle flicker (V3 pneumatic) | 0W | 0 | 1 cylinder |
| Optical (consolidated, on claw) | — | 1 | — |
| Total | 33W of 88W | 4 ports | 1 cylinder |
Compare to V1+V2 stacked: 44W and 5 sensor ports. V3 saves 11W and one Smart port, which goes back into the budget for future expansions or backup capacity.
When To Commit V3
- V1 toggle flipper has logged at least 6 matches with no failures.
- V2 wrist rotator has logged at least 6 matches with confirmed orientation recovery.
- Team has working pneumatic infrastructure on the robot for another reason (manipulator release, intake actuation, etc.).
- State competition is ≤3 weeks away. (Don't commit V3 the week before competition — the auto-rotate code path needs scrimmage time.)
If any of those four are missing, stay at V2 and revisit V3 next iteration. The polish only pays off when the foundation underneath it is rock-solid.
Build Order & Decisions 🔨
Recommended Build Sequence
- Main manipulator first. Architecture A or B from mechanism-claw. Get pin and cup pickup + placement working reliably. Mtg 8 deadline.
- Drivetrain & sensors integration. Get IMU + GPS + AprilTag pipeline working. Mtg 9 deadline.
- Toggle flipper (V1 secondary). Add the dedicated post at chassis far end with motor + V5 wheel + Optical sensor. Practice alignment-and-flip.
- Pin rotator (V2 secondary). Defer until V1 toggle flipper is reliable on-field and the team has logged enough scrimmages to confirm wrong-orientation pin recovery is worth the motor.
- V3 polish pass. Pneumatic toggle flicker, auto-rotate pickup, sensor consolidation. Defer until V1 and V2 each have at least 6 successful matches AND the team has pneumatic infrastructure for another reason. State-comp readiness target.
Motor Budget Allocation
Override allows 88W of non-drivetrain motor power (R10a) plus 55W drivetrain (R11a). Below is a sample allocation showing both V1 and V2 fit comfortably.
| Mechanism | Motor Power | Tier |
|---|---|---|
| 4-bar lift (Architecture A) | 11W | V1 main |
| V5 horizontal claw | 11W | V1 main |
| Toggle flipper (this page) | 11W | V1 secondary |
| Pin rotator wrist (this page) | 11W | V2 secondary |
| Reserve / future | 44W remaining | — |
Total non-drive: 44W of 88W used in V2 configuration. Plenty of headroom for additional mechanisms.