Why Toggles Matter ⚡
The 62% Number
Override has 63 pins. Each pin has 2 halves, so 126 pin halves total. Of those, the yellow halves break down as follows:
| Pin Type | Count | Yellow Halves |
|---|---|---|
| red/yellow | 20 pins | 20 yellow halves |
| blue/yellow | 20 pins | 20 yellow halves |
| yellow/yellow | 19 pins | 38 yellow halves |
| red/blue | 4 pins | 0 yellow halves |
| Total yellow halves on the field | 78 out of 126 = 62% | |
By comparison, all 48 red/blue halves combined (24 red + 24 blue, the directly-scoring colors) cap at 48 × 5 = 240 points. So the yellow-half lever alone is potentially over 3× the value of every direct red/blue half on the field.
Why This Matters Strategically
- The single most valuable thing a robot can do is establish toggle control in their best-loaded quadrant before opponents react.
- Defending a toggle is more valuable than scoring 2 more red pins. A toggle controlling 6 visible yellow halves = 60 points; 2 red pins on goals = 10 points.
- Stealing a toggle can swing 60-100 points in a single 1-second action. There's no other action in the game with that point density.
How Toggles Work ⚙
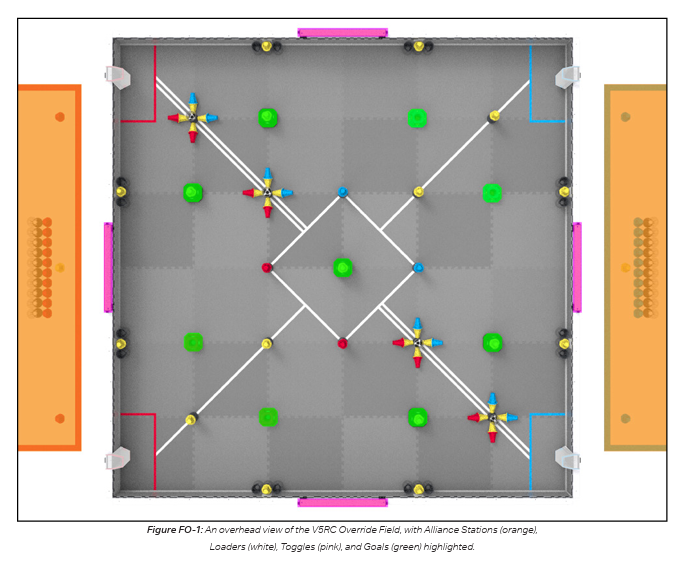
The Four Quadrants
The field divides into 4 quadrants. Each quadrant contains 1 alliance-colored goal + 1 short neutral goal + 1 toggle. The midfield has the tall center goal but no toggle.
| Quadrant | Alliance Goal | Neutral Goal | Toggle |
|---|---|---|---|
| Red NW | 1 red goal | 1 short neutral | 1 toggle (any state) |
| Red SE | 1 red goal | 1 short neutral | 1 toggle (any state) |
| Blue NE | 1 blue goal | 1 short neutral | 1 toggle (any state) |
| Blue SW | 1 blue goal | 1 short neutral | 1 toggle (any state) |
The Three Toggle States
Toggle Activation (Pending Confirmation)
The v0.1 manual confirms toggles exist and what they do. It does not precisely specify how a toggle is activated. Until the VEX Q&A clarifies (forum opens May 14, 2026), we assume:
- Toggles are physically pressed/pushed (similar to past V5RC field elements like beacons or buttons).
- Toggles are re-toggleable freely throughout the match — the most recent activation wins.
- The activation includes a color selection (red, yellow, or blue) based on which side or button is pressed.
The Math 📊
Per-Half Scoring (SC3) Refresher
A pin half scores if (a) not covered by a cup, OR (b) covered by the transparent half of a cup. Opaque coverage suppresses the half from scoring.
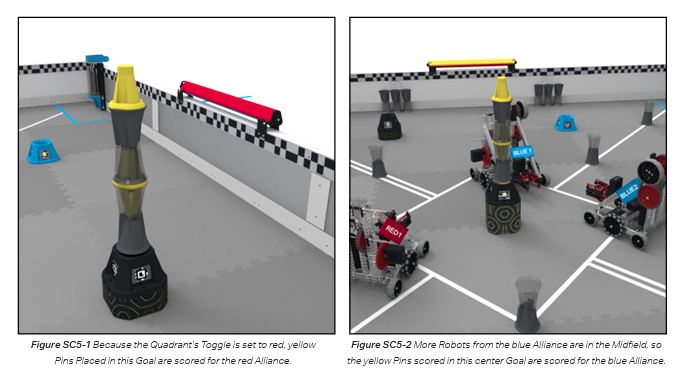
Worked Example 1: Single Yellow Pin in a Red-Toggled Quadrant
You place 1 yellow/yellow pin on a neutral goal in a quadrant where the toggle is set to red. No cup yet.
Now add a cup, transparent side toward the pin's upper half. The cup's upper hourglass nests over the pin. The cup's transparent half is on the bottom.
Same pin, same cup, but cup placed opaque-side toward the pin instead.
So cup orientation matters by 10 points per yellow/yellow pin. A team scoring 5 yellow/yellow pins with correct cup orientation banks 100 points; with wrong orientation, 50 points.
Worked Example 2: 4 Yellow Pins in a Toggled Quadrant
Suppose your alliance places 4 yellow/yellow pins on goals in your toggled quadrant, all with correct cup orientation:
Worked Example 3: Toggle Steal Mid-Match
Your alliance places 6 yellow/yellow pins on goals in a quadrant whose toggle is currently red. With correct cup orientation, that's 12 visible yellow halves × 10 = 120 points scoring for red.
At 0:30 remaining, blue activates that quadrant's toggle and flips it to blue. Suddenly:
This is the most extreme single-action swing in Override. It's also why defending your active toggles is critical late in the match.
Worked Example 4: Center Goal + Endgame Bonus
The center goal is in the midfield, not in any quadrant, so no quadrant toggle directly controls it. However: per SG12, the alliance with the most robots inside the midfield boundary at clock-zero claims all yellow-pin points scored on the center goal.
If 4 yellow/yellow pins are placed on the center goal with correct cup orientation, that's 8 visible yellow halves × 10 = 80 points. Whoever wins the endgame claims those 80 points outright (in addition to +8 per robot in the boundary, +16 max).
This is why the Override Endgame Strategy page identifies the center-goal yellow loading as the primary input to endgame role decisions.
Strategic Decisions 🧐
Capture: Activate a Toggle Early
Capturing means you press a toggle in your favor first, before placing pins in that quadrant. Then you place yellow pins (especially yellow/yellow) in that quadrant and they immediately count.
- Best for: teams that can place pins fast in a single quadrant.
- Sequence: activate toggle → place 4-6 yellow pins in goals in that quadrant → maintain control.
- Risk: opponent flips the toggle later. Mitigate by defending the toggle late in the match.
Hoard-Then-Flip: Place Pins First, Activate Toggle Last
Some teams prefer placing yellow pins on goals in a quadrant without activating the toggle. Then at the right moment, activate. All those previously-placed pins suddenly score.
- Best for: teams that want to obscure their scoring, or who can't reliably defend a toggle for the whole match.
- Sequence: place 5-8 yellow pins in goals in a quadrant (toggle stays yellow) → activate toggle in your favor at 0:20 → opponent has 20 seconds to flip back.
- Risk: opponent flips back before clock-zero. The math swings against you. Fewer chances for opponent to react if you wait until 0:10 (but cutting it that close is risky if your activation mechanism fails).
Steal: Flip an Opponent's Toggle
Stealing means you reach an opponent's active toggle and flip it to yours, claiming all visible yellow halves they'd been accumulating.
- Best for: teams with fast, mobile robots and a flexible mechanism that can reach a toggle without releasing held pins.
- Sequence: identify a toggled quadrant where opponents have placed many yellow pins → drive to that toggle → flip it.
- Risk: opponents flip back. Steal late (last 30s) so they have less time to react.
Defend: Stay Near Your Active Toggle
If you've captured a toggle and have many yellow pins in that quadrant, defending the toggle is worth more than scoring more pins.
- Best for: alliance partner of a high-scoring robot. The defender stations near the toggle, blocks opponent approach.
- How: drive between the toggle and any approaching opponent. Body-block. SG12.2 only authorizes vigorous interactions in the midfield endgame — in the regular match, normal contact rules apply, but a blocking robot is still permitted.
- Risk: opportunity cost. Standing near a toggle means you're not scoring elsewhere. Worth it if the toggle controls 60+ yellow points.
Ignore: Let a Quadrant's Toggle Stay Yellow
If your team has decided not to compete in a particular quadrant, the toggle there can be left yellow (default). Yellow pins placed there score 0 for both alliances.
- Best for: 2-quadrant focus strategies. Some teams pick the 2 best-loaded quadrants and ignore the others entirely.
- Why: two robots can't cover 4 quadrants well. Picking 2 means deeper coverage.
- Risk: you're ceding the other 2 quadrants entirely. If opponents play well in those quadrants, you can't catch up.
Decision Tree
| Situation | Best Move |
|---|---|
| Match start, no toggles touched | Capture the toggle in your best-loaded quadrant first |
| You have 5+ yellow pins in a quadrant, toggle is yours, 30s left | Defend — stay nearby |
| Opponent has 5+ yellow pins in a quadrant, toggle is theirs | Steal at 0:30 or later |
| You have 5+ yellow pins in a quadrant, toggle is still yellow | Hoard-then-Flip at 0:15 (later if you can defend it) |
| You're behind 50+ pts, only winning move is endgame | Ignore toggles, focus on midfield endgame |
| Two quadrants are loaded with 10+ yellow pins each, toggles split between alliances | Steal the more valuable one in the last 20s |
Mechanism Implications 🔧
Do You Need a Dedicated Toggle Flipper?
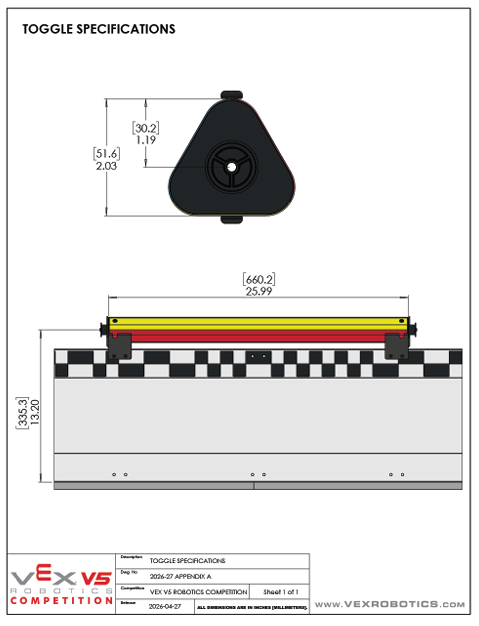
The activation mechanism for toggles is unconfirmed (Q&A pending). Assuming toggles are physically pressed similar to past field elements, your robot can activate a toggle by:
- Bumper contact — ram into the toggle. Works if toggle is at bumper height and pressing is the activation gesture. No extra hardware.
- Manipulator press — lower the manipulator gripper onto the toggle. Works if toggle is between bumper and goal heights. Uses your existing arm.
- Dedicated flipper — a small servo or paddle specifically for toggles. Adds 1 motor + linkage. Most flexibility, most cost.
1+1 Possession (SG6) Constrains Accumulation
Yellow pin accumulation strategy is bounded by the 1+1 possession limit. You can't collect 5 yellow pins on your robot and dump them all in a quadrant in one trip. Each yellow pin requires a separate trip:
- Pick up 1 pin from match-load loader or a field pin pool.
- Drive to your target quadrant's goal.
- Place the pin in the goal.
- Repeat 4-6 times to load up the quadrant.
This means hoarding yellow pins in a quadrant takes 1:00 of cycle time. Capturing the toggle (a single-second action) at the right moment magnifies all that accumulated work.
Pattern: Cycle + Toggle
Most efficient sequence for a single robot in a single quadrant:
- 0:00 — auto: activate quadrant's toggle if reachable. Place 1-2 alliance pins on alliance goal for AWP requirement.
- 0:15-0:45 — cycle: pickup yellow pin from loader, place in quadrant's short neutral goal, return. Repeat 4-5 times.
- 1:00-1:30 — cup placement: pick up cups, place on top of pins with correct orientation.
- 1:30-1:50 — defend toggle. Sit between toggle and opponent approach paths.
- 1:50-2:00 — endgame: collapse height if entering midfield (see Override Endgame Strategy), or stay outside.
Sensors That Help Toggle Play
| Sensor | Use | Notes |
|---|---|---|
| Distance sensor (front bumper) | Aim at toggle for activation | Reliable, cheap. ~$13 part. Works through field lighting. |
| Optical sensor on manipulator | Detect cup orientation before placement | See sensors-optical when published. Critical for yellow scoring. |
| AI Vision Sensor | Identify toggles + goals from a distance | Useful but not necessary for toggle play specifically. Use for navigation. |
Coordinated Alliance Strategy
Two-robot alliance toggle play multiplies impact:
- Specialize: One robot focuses on yellow-pin cycling (4-6 trips). The other places cups (with correct orientation) and defends toggles.
- Cover 2 quadrants: Each robot picks a quadrant. Both activate & defend their respective toggles.
- Late-match steal: If opponents have hoarded yellow pins in a quadrant under their toggle, your fast robot makes a steal run at 0:25.